Wall Plaster may not seem like an obvious try to use in model construction, but I found it to be easy to apply and robust for handling. Though heavier than Plaster of Paris, the weight wasn't necessarily a bad thing since as tabletop players know, we always bonk into things and moves things about, but being so heavy it would hardly ever budge.
I first started thinking about the layout that I wanted. So I wanted a hill that had trenches dug into and I wanted the back piece to high enough that the top of a Hiss Tank could peak over it, so that it would get the 'Hull Down' Dodge Modifier in combat. So I cut out the cardboard pieces to match the heights that I wanted, then taped and glued them in place so that they would be sturdy.

 I also wanted to give the inside of the trenches a trenchy kind of look so I planned on putting in these short sized popsicle sticks on the walls of the inside of the trenches. I just taped them together in one long piece and poured glue to join them together. I also wanted to put covers over the trenches so that I could use the hill as just a plain hill. So I also used the popsicle sticks for this, only this time I put on a piece of mesh as well as I intended to cover it with plaster too.

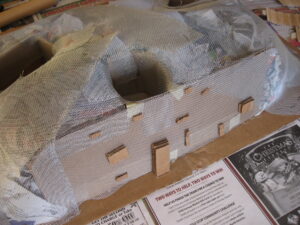
 Next I used a wire mesh, the kind you use to repair screens with, and rolled up balls of newspaper underneath it. The mesh was kept down with a combination of staples and metal pins. Since you'd be covering it up with plaster anyway it didn't have to look pretty it just had to hold the pieces in place long enough. The parts in the middle did stick out quite a bit, but enough plaster was able to keep it down, but I did have to apply it three times.


For the back of the hill I wanted it to be almost like a cliff face, so I added these random pieces of cardboard to use as stepping stones. Looks silly now but I like how it turned out. The drywall plaster is what I used, like I said it was heavy stuff, but I must say that I preferred the result more so than I did with the Plaster of Paris.

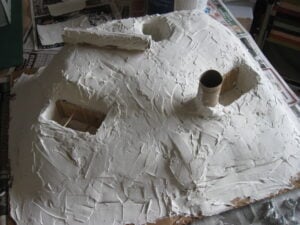
Here's what it looked like with just the plaster on. I just used a simple putty knife to apply it. As you can see I decided to add a fallen log and a toilet paper roll as the bottom of a tree. I ended up doing one main layer then a bit of touch ups, particularly in the middle with that one piece of mesh that just kept sticking up. This was also when I stuck in the popsicle sticks that made up the inside of the trench walls. The back of the cliff as you can see looks quite different with the plaster on it. I really liked the texture that everything got with the plaster on it. It made it look and feel authentic. It did take a bit to dry, like a couple days worth and I had put this on the side of the house that gets a lot of sun, but it was in the winter so it did take longer. Plaster of Paris was usually dry within minutes.

Then I painted the hill green and the trenches a light brown for what I thought would be loose dirt or mud. The trees were a darker brown. I did paint the trees too a darker brown. Then once painted I poked holes in it with a knife and stuck little branches in it. I design my trees as skeletons so that the figures can sit in them and I don't have all the hassle with the greenery. Greenery would make it look nicer but far less practical in its use. I also applied some plaster along the surface of the log (left over tube from gift wrapping) and it made this nice bark like effect. I kind of wish I did that with the tree too, but oh well.


I did finish the trench covers as well too, I didn't take a picture, but I ended up coating both sides in plaster, one side then the other. So if you can imagine a white rectangle that's what it looked like. I painted it green and then later on I sprinkled glue on them and put on the moss stuff that I used to make my bushes in the other tutorial. I am pretty happy with how it's turned out and keep in mind I made this thing in early 2013 and I'm still using it, it's held up well. There's been a few scuffs along the edge that will require me to repaint it if I want it to look perfect, but otherwise it's held up great. I find the heavy weight of it to be beneficial as its a hill its supposed to be something solid that you can things move onto. The only drawback to this was the time it took to finally dry out so if you are in a rush to make something in time for a game, then this plaster may not be the choice for you. To read more of my How-To's click here
I also wanted to give the inside of the trenches a trenchy kind of look so I planned on putting in these short sized popsicle sticks on the walls of the inside of the trenches. I just taped them together in one long piece and poured glue to join them together. I also wanted to put covers over the trenches so that I could use the hill as just a plain hill. So I also used the popsicle sticks for this, only this time I put on a piece of mesh as well as I intended to cover it with plaster too.
Next I used a wire mesh, the kind you use to repair screens with, and rolled up balls of newspaper underneath it. The mesh was kept down with a combination of staples and metal pins. Since you'd be covering it up with plaster anyway it didn't have to look pretty it just had to hold the pieces in place long enough. The parts in the middle did stick out quite a bit, but enough plaster was able to keep it down, but I did have to apply it three times.
For the back of the hill I wanted it to be almost like a cliff face, so I added these random pieces of cardboard to use as stepping stones. Looks silly now but I like how it turned out. The drywall plaster is what I used, like I said it was heavy stuff, but I must say that I preferred the result more so than I did with the Plaster of Paris.
Here's what it looked like with just the plaster on. I just used a simple putty knife to apply it. As you can see I decided to add a fallen log and a toilet paper roll as the bottom of a tree. I ended up doing one main layer then a bit of touch ups, particularly in the middle with that one piece of mesh that just kept sticking up. This was also when I stuck in the popsicle sticks that made up the inside of the trench walls. The back of the cliff as you can see looks quite different with the plaster on it. I really liked the texture that everything got with the plaster on it. It made it look and feel authentic. It did take a bit to dry, like a couple days worth and I had put this on the side of the house that gets a lot of sun, but it was in the winter so it did take longer. Plaster of Paris was usually dry within minutes.
Then I painted the hill green and the trenches a light brown for what I thought would be loose dirt or mud. The trees were a darker brown. I did paint the trees too a darker brown. Then once painted I poked holes in it with a knife and stuck little branches in it. I design my trees as skeletons so that the figures can sit in them and I don't have all the hassle with the greenery. Greenery would make it look nicer but far less practical in its use. I also applied some plaster along the surface of the log (left over tube from gift wrapping) and it made this nice bark like effect. I kind of wish I did that with the tree too, but oh well.
I did finish the trench covers as well too, I didn't take a picture, but I ended up coating both sides in plaster, one side then the other. So if you can imagine a white rectangle that's what it looked like. I painted it green and then later on I sprinkled glue on them and put on the moss stuff that I used to make my bushes in the other tutorial. I am pretty happy with how it's turned out and keep in mind I made this thing in early 2013 and I'm still using it, it's held up well. There's been a few scuffs along the edge that will require me to repaint it if I want it to look perfect, but otherwise it's held up great. I find the heavy weight of it to be beneficial as its a hill its supposed to be something solid that you can things move onto. The only drawback to this was the time it took to finally dry out so if you are in a rush to make something in time for a game, then this plaster may not be the choice for you. To read more of my How-To's click here